How to Add a Sidebar to Your Squarespace Blog
I used to have a WordPress blog, and when I moved to Squarespace, the blog sidebar was the ONE (and only) thing I missed about WordPress. Squarespace does not have a standard way to add a sidebar to your blog. There is a kludgy workaround you can use that involves a “dummy blog” and a summary block, but I don’t think it’s the best approach.
I use the SQSPThemes Sidebar Plugin* on my blog. This plugin allows you to build your sidebar on a page on your website (easy!) and then adds that sidebar, automatically, to all of your blog posts. You can use this plugin to add sidebars to ANY page on your website, but we will focus on the blog in this post. (Note, you need a Core Squarespace plan or higher to use this plugin to gave access to the header code injection field.)
Why Do You Need a Blog Sidebar?
You don’t NEED a blog sidebar, but having a little advertising space on all of your blog posts can help you:
Introduce yourself to blog visitors who find you though search
Keep people on your website longer as they explore items on your sidebar (great for SEO)
Get more newsletter sign-ups
Promote your products or services
Read on to learn how to use the SQSPThemes Sidebar Plugin* to add a sidebar to your Squarespace blog. If you prefer to watch, here is a video demo of what I explain below:
1. Purchase the Plugin
Use this link to purchase the plugin: SQSP Themes Sidebar Plugin*
Your plugin will be delivered as a Zip file that you need to extract on your hard drive that contains three files:
Instructions (HTML file)
plugin-sidebar (Cascading Style Sheet file)
plugin-sidebar (JavaScript file)
2. Upload the Plugin Files to Your Website
It’s not straightforward to upload files to Squarespace, but here is how you do it:
Go to the Pages panel
Click the plus sign (+) as if you are going to add a page
Scroll down to the very bottom of the list, in the more section, and select link
Leave title blank (you do not need to add a title for your links)
Change URL to File
Click the Upload button to upload the files from your computer
You would also use the steps above to access files you have already uploaded if you need to delete them and add new versions or remove them from your website if you stop using the plugin.
3. Create Your Sidebar
Follow these steps to create and style your sidebar:
Create a new page in the NOT LINKED section and build your sidebar using any blocks you like
Use “sidebar” as the URL slug for the page (you can use anything but this is the default)
The page needs to be enabled (don’t disable it) and NOT password protected
Hide the page from search results (Page Settings > SEO tab)
Focus on styling MOBILE view, because that is the view that gets displayed on your blog
Here are some things that are great to include on your blog sidebar:
A picture of you
A short description of what you do
Buttons linking to your shop or services page
Newsletter sign-up
Promote a lead magnet
Summary block that includes featured blog posts (users would only see one but could scroll through them)
Search bar – to search your blog
Archive Block – to display a list of blog categories people can click on to view posts in that category
Social media icons
I recommend finding a balance between sharing the most important things but not making it too visually distracting.
4. Install Your Sidebar
Double click on the “Instructions” HTML file on your computer and it will open up a page in your default web browser that looks like this
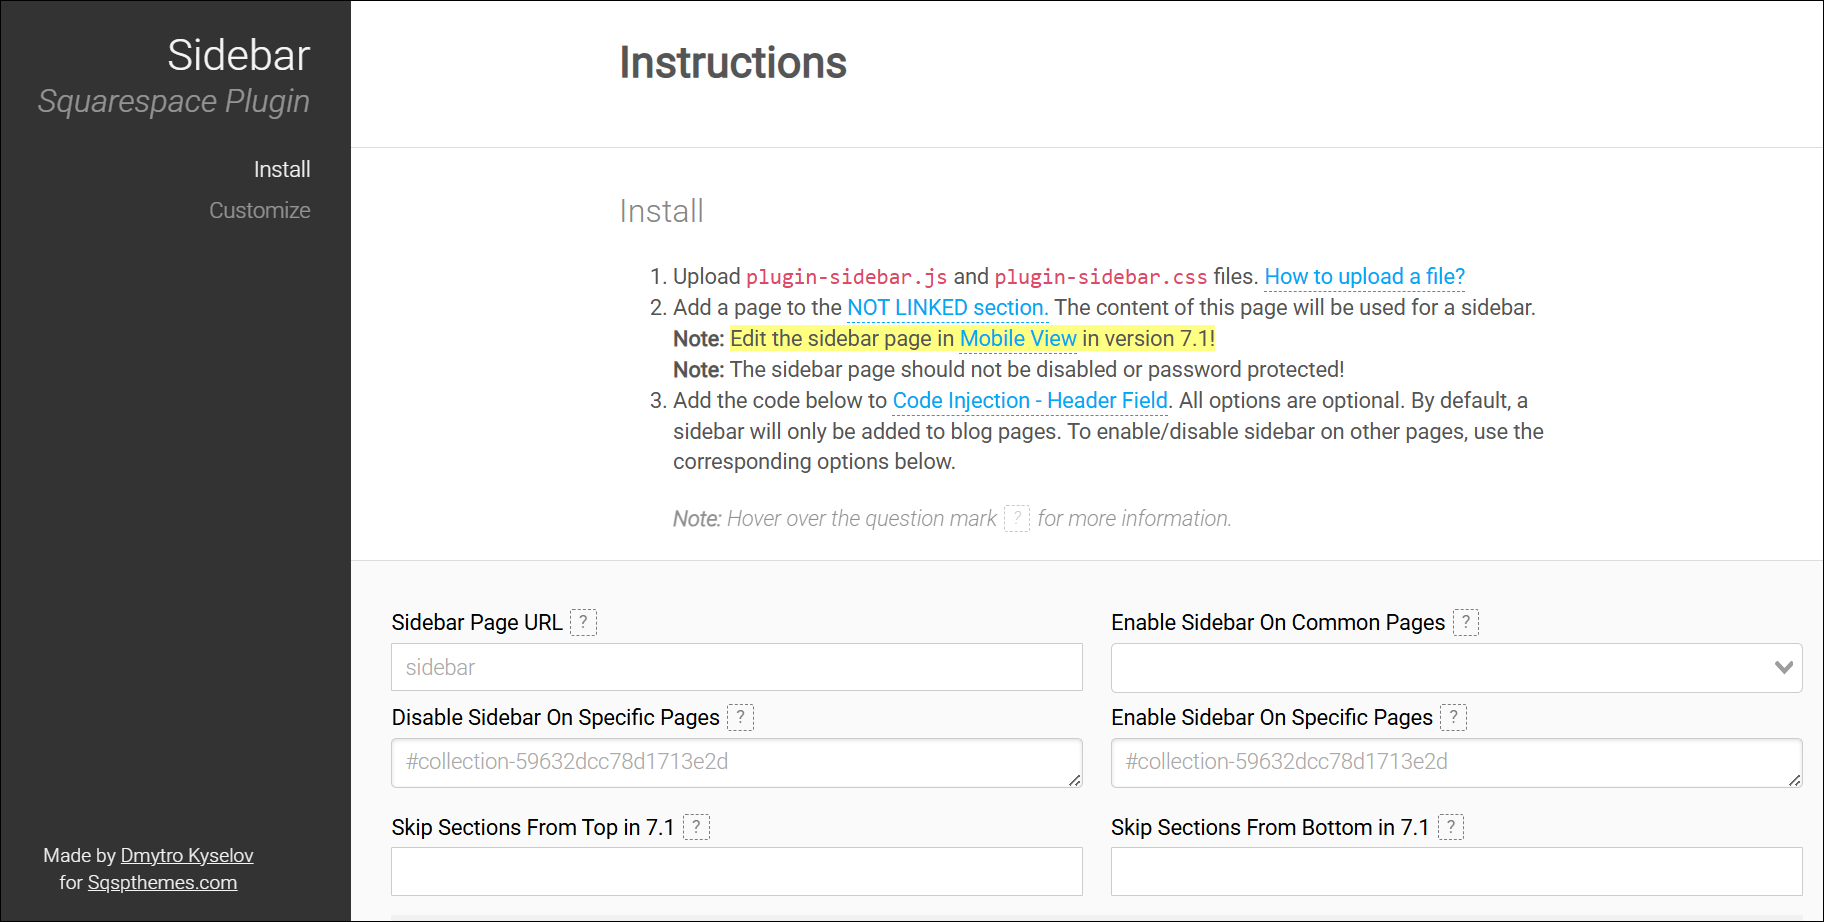
The first form on this page is used to generate the code that will install the sidebar you designed. As you update the fields, the code underneath is automatically updated. Hover over the question marks for more help on each field.
Here are some tips to fill in the fields to generate the install code. (Note: if there is a light gray value in the field, that is the default value and you don’t have to change it if you want to use the default)
Sidebar Page URL – add your sidebar page URL (the default URL is sidebar)
Enable Sidebar on Common Pages – if you leave this blank, the sidebar will appear on both the main blog page and on all blog posts
Select blog item if you ONLY want the sidebar to appear on blog posts (this is what I do on my blog)
Select blog if you ONLY want your sidebar to appear on your main blog page
If you wanted to display your sidebar on a different type of page, you can see those options here (some of these page types are only relevant for older 7.0 websites)
Disable Sidebar on Specific Pages – you can use this field to EXCLUDE showing your sidebar on specific pages (overall blogs or blog posts). Use the Squarespace ID Finder Chrome extension to get the item or collection IDs to exclude. (This is not a common scenario. See my notes below if you have multiple blogs on your website.)
Enable Sidebar on Specific Pages – if it makes more sense to explicitly INCLUDE specific blogs or blog posts, use this field to enter the item or collection IDs (again, not common)
Skip Sections from the Top and Bottom in 7.1 – these fields are not relevant to blogs
After you have filled in all of the relevant fields, copy the code and add it to your website:
Click the Copy Code button
Navigate to the Page Header Code Injection for your Blog
Go to the Page Settings for your Blog (Gear Icon next to the main blog page)
Go to the Advanced Tab
Select Custom Code
Select Page Header Code Injection
Paste in the install code
You may have multiple blogs on your website that you use for different purposes. (You might have a digital product or lead magnet that uses a blog behind a paywall, for example.)
If you only want your sidebar to appear on one specific blog, add the install code to the PAGE header code injection for that specific blog (as we did above).
If you want different sidebars to appear on different blogs, create two different sidebar pages with different URLs (/sidebar1 and /sidebar2). Then generate installation code for EACH sidebar and install it on the page header code injection for the relevant blog.
If you want the same sidebar to appear on multiple blogs, add the install code to the overall website header code injection. (Pages Panel > Scroll down top Custom Code > Select Code Injection > Paste into the Header Code Injection field)
If this code injection field is not where I said it is. Use the / button on your keyboard to display the search box and search for “Code Injection”.
5. Use CSS to Style the Sidebar
At the bottom of the Instructions page, there is a second form that generates the CSS code that styles the sidebar that looks like this:
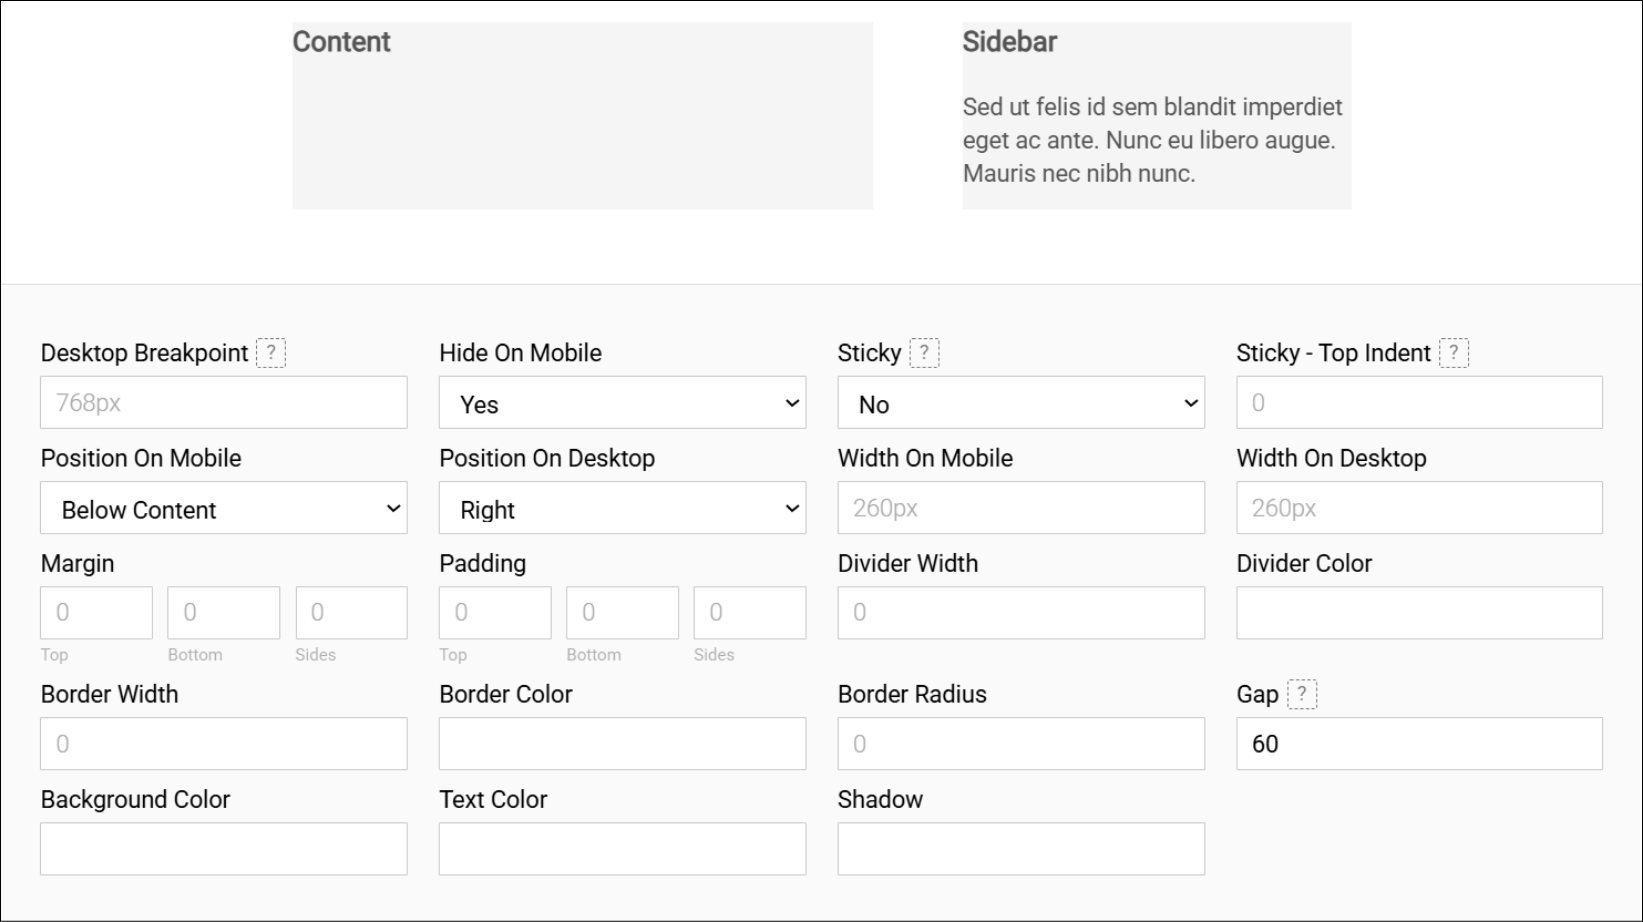
This plugin has been around for a while and Squarespace has evolved! Most of this formatting you can do directly on your sidebar page, so you don’t need these settings. I leave almost all of them blank.
There is a demo area above these settings that will adjust as you change the formatting fields below so you can get a preview of what they do (margin, padding, divider, border, background, text).
Desktop Breakpoint – I use the default 768px (this is the standard breakpoint that tells the code when the screen is mobile size, below 768px)
Hide on Mobile – I set this to YES to hide my sidebar on mobile
Sticky – Set this to No. If your sidebar is sticky people won’t see the whole sidebar unless they scroll to the end of your post.
Sticky – Top Indent – Only relevant if you have a sticky sidebar
Position on Mobile – IF you want to show your sidebar on mobile you can show it above or below the blog post
Position on Desktop – I like my sidebar on the RIGHT of my blog post, but you can also put it on the LEFT
Width on Mobile – Leave this as the default (irrelevant if you don’t show your sidebar on mobile)
Width on Desktop – I use the default 260px (start with this and adjust as needed)
Margin & Padding – I leave these fields blank. The margin and padding that is added by default, based on the sidebar mobile view design works for me.
Divider Width & Color – adds a divider line (in pixels) between your sidebar and your blog post
Border Width & Color – adds a border (in pixels) around your sidebar
Border Radius – adds a curve (in pixels) to the corners your border
Gap – this is the number of pixels between your content and the sidebar The default is 30px, I increased mine to 60px.
Background & Text Color – Style these directly on your sidebar page
Shadow – Use to add a shadow to your sidebar
After you have filled in all of the relevant fields, copy the code and add it to your website:
Click the For Custom CSS button
Copy/paste the code into your CSS Panel (Pages Panel > Scroll down to Custom Code > Select Custom CSS)
If the CSS panel is not where I said it is, use the / button on your keyboard to display the search box and search for “CSS”
After you add your CSS code, go check out your sidebar and see how it looks! You can adjust the customization CSS as needed and update the code in the CSS panel.
If you are using multiple sidebars on your website, that you want to style differently, you can use the Scope field to apply this code to only ONE of your sidebars.
You have the option to paste the code into your Code Injection field, but I prefer to keep all of my CSS in the CSS panel.
How To Get More Help
If you have any issues or more detailed questions about the plugin, reach out to SQSP Themes support
The Net-Net
The SQSP Themes Sidebar Plugin* is the easiest way to add a sidebar to your Squarespace blog. You set it up once and it will automatically be applied to every blog post you create. Updating the content on the sidebar is as easy as updating a page on your website. Use the button below to purchase the plugin and level up your Squarespace blog!